UT3 / UDK – Unreal Development Kit
::: Prefab :::
Creating and using Prefabs
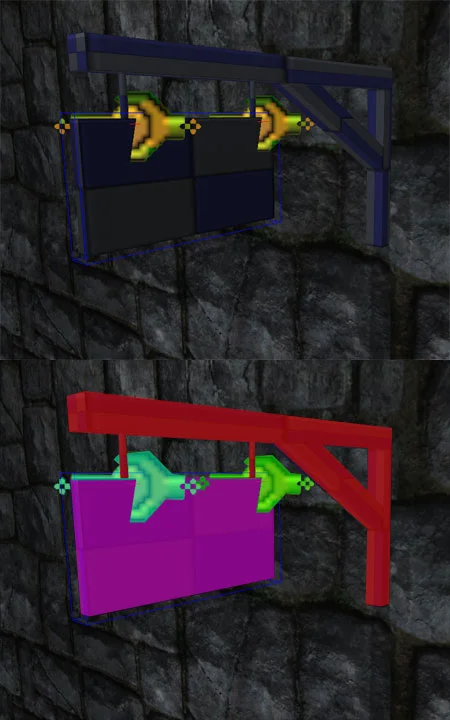
Have you ever constructed a building that you want to instance around the map which is constructed out of modular pieces? Or have you ever put together a physics asset with an “RB_BSJointActor” to connect multiple assets to one another? Selecting and moving all of these pieces can be a pain at times. What a ‘Prefab’ does is it connects everything that is selected in the scene into a single group, and it is VERY easy to use.
First off, we need something to create a prefab from.
Creating and using Prefabs
Have you ever constructed a building that you want to instance around the map which is constructed out of modular pieces? Or have you ever put together a physics asset with an “RB_BSJointActor” to connect multiple assets to one another? Selecting and moving all of these pieces can be a pain at times. What a ‘Prefab’ does is it connects everything that is selected in the scene into a single group, and it is VERY easy to use.
First off, we need something to create a prefab from.
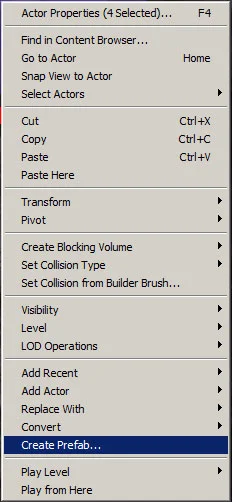
To create a prefab, select all the pieces you want to be in it, right click and scroll down to 'Create Prefab'. It will ask you which package, group and what name you want it to be created.
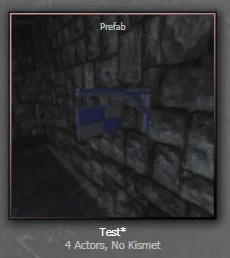
When you create this, make sure your perspective view is lined up since it will be used to make a 'screen shot' for the icon in the general browser window.
It will then ask you if you want to 'replace these actors with an instance of the new prefab'. I generally select yes for this option.
It will then ask you if you want to 'replace these actors with an instance of the new prefab'. I generally select yes for this option.
When you create this, it does not duplicate every piece of geometry in the General Browser again, it simply contains information to group these pieces with one node, Because of this, the original pieces are still required within the general browser.
If you duplicate the same asset around the scene, everything will work correctly, however if you want to change any visual aspect of the asset, it can easily be done.

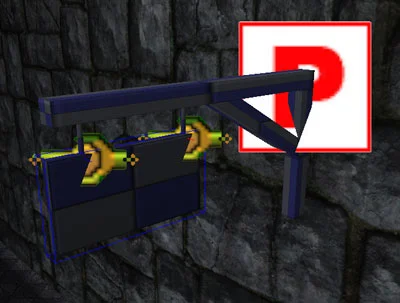
At the top of your editor, there is an icon with the letter P on it. By clicking this, it allows you to select the individual pieces of the prefabs. Individual pieces can be changed, materials can be altered, positions moved and settings can be tweaked for the joints holding them together. The assets can still be moved by selecting the P icon itself, but selecting an individual piece of geometry and moving it will only move that one piece. Turning the 'P' back on will group everything back into a single selectable piece again.
The best thing about prefabs (aside from grouping large amounts of assets together into a single group) is the ability to update them. You can have a 'place holder' asset and place them around the level, and update that one prefab, and in return update every other prefab in the scene.
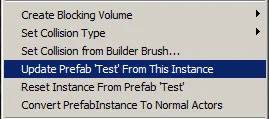
To do this, turn off the 'P' button so the individual pieces can be tweaked. Change it to what you want, and turn the 'P' button back on. Right click on the prefab and select “Update”
prefab 'Name' from this instance” This will update the prefab in the general browser and take another screen shot as well, so make sure your perspective view port is lined up.
Prefabs keep an individual account of what each prefab setting is changed, so if you have 10 prefabs and you change the material of one and then use another to update the prefab instance, that change done to that single prefab will stay intact, but the rest of the prefab will update along with the rest in the scene.
For this example, if I tweak the materials of the sign for each prefab, but have another default prefab in the scene with tweaked physics settings, when you update that the Prefab by using the physics tweaked version, the physics will copy through to all the others, but because your originally tweaked the materials of the signs themselves, they stay intact. So individual aspects of the prefabs can be tweaked and updated or maintained, depending on your personal requirements.
This is an extremely powerful way to unify all assets, physics or whatever else throughout your maps.
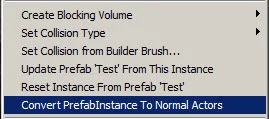
If for whatever reason you want to remove the prefab setting so the individual assets are there and no longer 'grouped', right click on the prefab and select “Convert prefab Instance to normal actors” and the 'prefab' function will be removed.
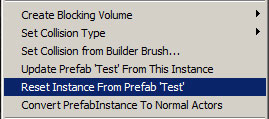
If you want to reset the prefab so any changes you have done for that individual piece are removed, right click and select “Reset Instance from Prefab 'Name”.
Since prefabs reference the original assets, as long as there are no tweaked materials applied to the individual prefabs, any changes done to the original assets themselves will follow through to the prefabs placed all around the map.
This allows for EASY testing such as a place holder sign or lamp with physics applied to it which consist of multiple assets. Create one, make a prefab, place it around the levels and update it later on.
I hope this little tutorial has helped you out. i thank you for your time.