UT3 / UDK – Unreal Development Kit
::: Physics Asset: Tutorial 1:::
This tutorial will go through a simple setup for a physics asset which can be done in both UT3 and UDK. This particular one will be an old medieval street light dangling from a rope which is attached to a wooden support. This will focus only on the rigging and physics construction side of the asset.
First we need a model.
We need only 4 joints to make this all work. Two for the rope, and one for the lamp.
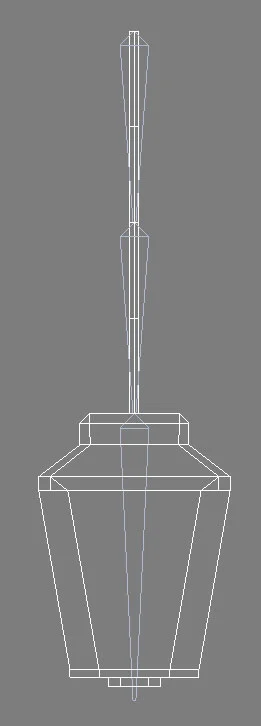
The joints used to deform the mesh are shown below. The 4th joint is simply placed above the rest of the joints which will be used as an anchor for everything else.
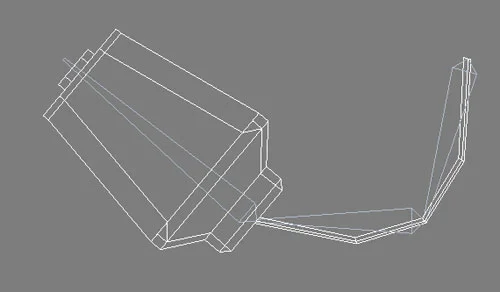
Just for an idea, after the weighting is done, if you rotate each joint, this is the result we have.
The rope is low poly, but there is enough detail there to give a believable dynamic feel to it.
The rope requires at least 2 joints to make it function like a rope. Once it is in the engine, the joints will not have any collision for the rope itself, but the lamp will, and the mass for the lamp will be set up in such a way that it will pull the rope down, giving it the appearance that it bends slightly when you shoot it, but straightens up right away, so twisting, bending or looping of the rope is not required, this is why we can get away with such low poly geometry.
To export these assets, you will need 'Actor X'. the link can be found below. This site also shows you how to install and use this tool located at the very bottom of the link.
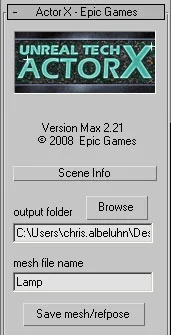
When you are ready, select the location you want to export this to and the 'mesh file name' and hit 'save mesh/refpose' Since we are not animating anything, the 'animation file name' and 'sequence' or 'range' are not important.
Export the 'street pole' mesh as a “.ASE” format like any other mesh. Apply collision to it if you want the dynamic light to interact with the pole and so you can't shoot or walk through it. In this case, 3 simple collision boxes should do just fine.
Importing the assets is the same as importing anything else.
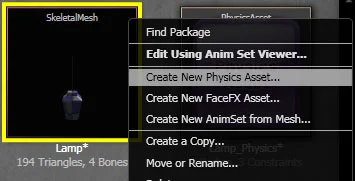
You will notice that when the 'lamp' is imported, it seems to be transparent. Double click on the 'lamp' asset to open up its 'AnimSet Editor' properties. Since this mesh has a skeleton in it, this is the screen that will come up.
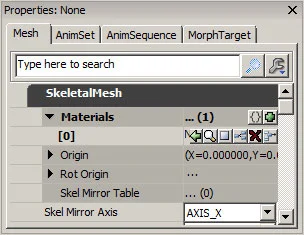
To remove this 'transparent' look, navigate to the 'mesh' menu on the far bottom left and click on the plus button beside the 'materials' section. This will place a [0] material slot, causing the asset to be solid and no longer transparent.
To remove this 'transparent' look, navigate to the 'mesh' menu on the far bottom left and click on the plus button beside the 'materials' section. This will place a [0] material slot, causing the asset to be solid and no longer transparent.
It will then come up with a window giving you different options for your new mesh. These options all stand for different things obviously, but for now, these are the settings I will be using.
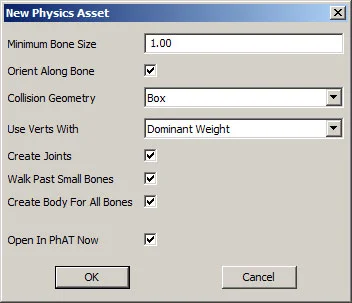
Minimum Bone size: This is not an issue here, but if your bones are too small, you may want to change these values
Orient along bone: This i keep checked.
Collision Geometry: For this, you have 2 options. Box or Sphere/Pill. Both have their purposes, but for now, i will only be using the box collision. Characters generally use the pill shape to make for easy and quick collision and rag doll effects.
Use Verts with: Dominant Weight or Any Weight. I keep this at default 'Dominant Weight' and it works fine for this asset.
Create joints: This will create a joint based on the current joints in your imported file. CHECK!
Walk past small bones: This will ignore any bones smaller than the 'Minimum Bone Size' value talked about earlier. If you have an issue with your asset not bringing in your bones correctly, play with these values.
Create Body For All Bones: By default this is un-checked, but what it is asking is if we want ocllision geometry created for all of the joints we are importing, and yes we do.
Open in PhaT Now: just asks if you want to edit it right away.
The 'UnrealPhaT' window should appear, if it doesn't simply double click on the newly created physics asset. This is what it should look like.

To get a better grasp on this window and all the functions, take a look at Epics forum site located here.
http://udn.epicgames.com/Three/PhATUserGuide.html
The 'Tree' on the lower right hand side is where the joints are displayed with the names given to them in Max. Setting these names up in max will greatly help you better handle them once in the Unreal engine.
The menu above that is where the options for the asset are located. These settings change based on which joints you have selected, allowing for complete individual control.
These are the main functions we will be using and their function described beside it.

1. Editing Mode: Toggle between editing physical bodies or constraints.
2. Movement Space: This is where you change between world and local space
3. Translate mode: The option you use to translate an asset
4. Rotation mode: The option you use to rotate an asset
5. Scale mode: The option you use to scale an asset
6. Snap: Snap to increments of 1 when translating and 15 degrees when you rotate.
7. Copy: There is no 'paste'. Press this, hold C and select what you want it copied to.
8. Play: This plays the simulation, allowing for you interact and see how it is.
9. Collision: This cycles through the 3 types of collision. Solid, wire and off.
10. Hierarchy: This toggles the graphical hierarchy of the joints in the scene.
11. Bone Influences: This will show what geometry your bones are controlling.
There are of course other functions, but for now, these are what we will be using.
To get started, we need to understand what is shown in the screen on the left.
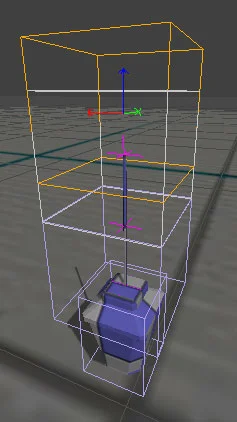
When you select a bone under the 'Tree' menu on the lower right, you will see that it selects the collision in the editor to the left. The reason why naming these bones come in handy is because on ocasion, these 'collision' boxes will move down around the joint chain, making it look like it belongs somewhere else.
The X, Y, Z illustrates the orientation of the collision box itself.
The Pink cross shows where the connection of joints are located. You can see this better by turning on the “Toggle graphics hierarchy”
First thing we should do is run a test to see what happens.
As you can see, barely anything happens. The collision geometry of the rope collides into each other, making it impossible for anything to animate correctly. If we re-scale these collisions by simply selecting them and choosing the 'scale' function, we get a much better result.
Remember that you can 'copy' the scaled value by pressing the 'Copy Properties', holding C and selecting a new collision.
Before we scale everything to fit the ropes and the lamp itself, we need to set up the 'Fixed bone'. Remember that 4th bone i talked about earlier, well, it is used to hold everything in place so everything doesn't fly around the level but rather it will stay with the asset you assign it to.
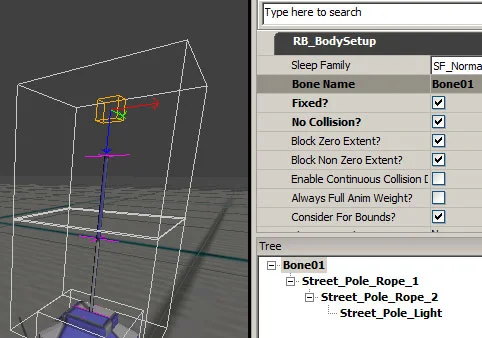
To set this up, Select the main bone (In this example, it is labelled 'Bone01' and check off the 'Fixed' and 'No Collision' options. This will make it stationary, and the collision box will not be calculated .
After that is done, let’s play back the animation. When you do this, holding Ctrl and left clicking will allow you to 'hit' the asset to see how it will animate, and holding Ctrl and right flicking will allow you hold onto it and move it around the scene.
This is what it should now look like.
If you notice, the collision boxes of the rope do not collide with one another at all, making it much harder to see any deformation. Most of what you see is simply swinging, but we want 'bouncing' and 'distortion' of the rope.
Since the ropes will not be intersecting any of the mesh, we can make the calculations easier and turn off the collisions by checking off 'No Collision?” for each of the rope collision boxes.
Now lets tweak the scale of the ropes and see the difference.
There is much more freedom for the ropes to contort and 'jiggle' around, but some assets will want different mass, resistance and limitations for these individual parts. To achieve this, I will be creating a 'physics material' for the rope and another one for the light itself so any 'rope' based dynamic assets i have in the level will all react the same way. If you go in and change the 'Physics Material' for the rope later on, it will effect everything that has it assigned to.
To create a 'Physics Material', simply right click in the 'General Browser' and select “New Physical Material” Open up its properties and this is what you will see.
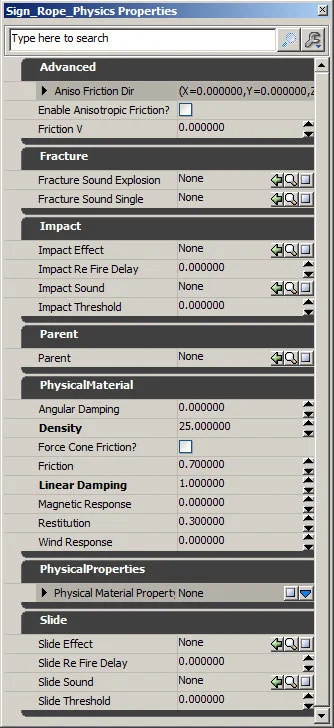
The only big changes i have made in it are the 'Density' and the 'Linear Damping'.
I won't be going into much detail about these settings, but the reason why I'm changing the Density is because by default, Unreal gives every asset a Density based on the scale of the asset, and since rope is so small, it has an extreamly tiney density, bumping it up will just give it a better look and feel.
In this case, i gave it a Density of 25
The 'Linear Damping' helps slow down the linear animation the ropes take on.
To apply this to the ropes, select the rope in the 'Tree' menu inside the UnrealPhAT editor, scroll down to 'Phys Material', select the 'Physics Material' in the general browser and press the green arrow to assign it
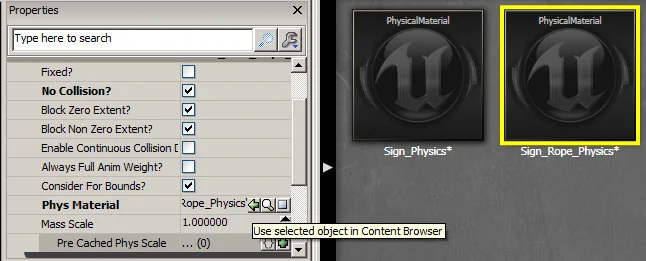
Do this for both the rope bones. I also created another physics material for the lamp and assigned that.
All of these values will change based on your model, and it will take some trial and error to get it looking the way you want it to.
This is what it looks like after the physics materials have been applied.
As you can see, there appears to be much more weight to the lamp, making it much more believeable. Physics is a touchy thing to get looking right, so to make it look and feel the way you want it, you have to be careful with the settings.
Here is the lamp in the scene running in game.
You may notice that the rope goes straight through the wood beam, which is not realistic, but if you create the rope with collision on it, they will get stuck on this wood and jitter terribly. Keeping it all separate is the easiest and cheapest way, and unless you're paying attention, you will not notice it.
I encourage you to experiment with the different settings and how they effect the physics assets in your scene in different ways.
Enjoy
I hope this little tutorial has helped you out. i thank you for your time.