UDK – Unreal Development Kit
Mesh Paint Mode / Vertex Painting
Vertex Painting: Within UDK, there is a new function which allows you to paint vertex colors.
The practicality of this is the same as any vertex painting materials you might do within maya or 3D Max, however you can see a real time representation of what it will look like in game and tweak it real time.
This web site covers the new features in UDK, and i strongly reccoment you to brows through it quickly.
http://udn.epicgames.com/Three/DevelopmentKitBuildUpgradeNotes.html
'Mesh Paint Tool' information can be found at this site
http://udn.epicgames.com/Three/MeshPaintReference.html
The web site above has valuable information, but this tutorial will go more in depth as to what can be done with this function.
This tutorial will cover a few different ways you can 'offset' the time or pattern for a flickering material. This method will allow you to use a single model and a single material node, the offset is done through vertex color, and the colors are painted onto the individual geometry, so each piece can have a different appearance to them while in actuality they are the same.
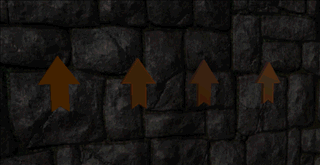
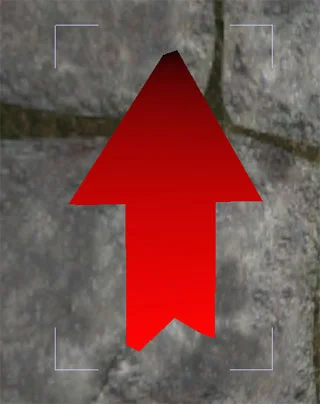
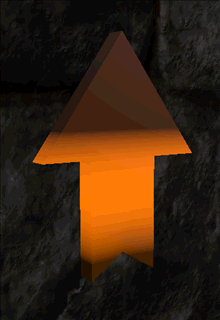
Let’s start out with a simple blink. We have an orange arrow with an emissive orange blink, however at the start; they are all blinking at the exact same time. With earlier engines, if you wanted to 'offset' this, you would have to create individual materials and tweak the settings. The more variation you wanted, the more materials were required, resulting in more memory being used up.
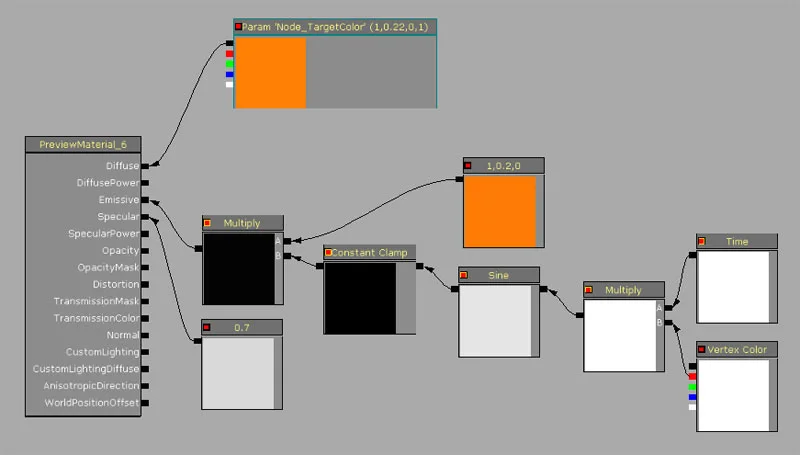
Let’s take a look at the shader network.

There is a 'Param' node with a value of 1, 0.2, 0 to give an orange tint to the mesh. This is the basis for the diffuse, and can't be any easier to set up. There is also a spec with a value of 0.7. The rest is where the magic happens.
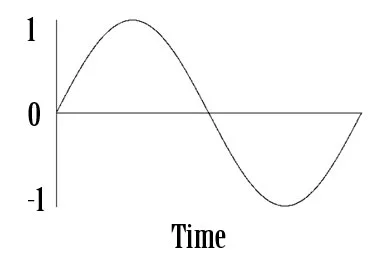
To get the flickering effect, we are going to use a 'Sine' node. Sign nodes start at 0, peak at one, back to 0, bottom out at -1 and back to 0. It is a complete loop.
The biggest problem with this is we'll be using the 'Sine' node and multiply it by the orange color, but if we do that, the negative will push the 'orange' to the other side of the color spectrum, so we need a 'constant clamp' to limit this value.
In order for the 'Sine' to animate, it requires a 'time' node to make it progress over the time in the game.
Next we need to 'Add' a vertex color to the 'time' before it is plugged into the 'Sine' node. By default, the sine node, no matter its 'period' setting loops every '1' unit. This might sound confusing, but hang in there, I’ll try to explain.
Sine waves loop, when you plug in 'time' to the 'sine' node, it loops once every '1' (any given period of time). The frequency of this repetition (how quickly it will repeat) is controlled by the sine’s 'period' variable. The higher the variable, the slower it repeats, but no matter the value it is given, the 'time' is always '1'.
Vertex colors in this case will deal with a 0 to 1 value, so when it is 'added' to the 'time', if the vertex color is painted 1white or black, the 'time' is offset by '1' which is a complete loop, so in this case, you will not see any change.
If we break this down into quarters, if you paint your vertex geometry with a value of .25, the pulse will be offset by 25%, a vertex value of .5 will offset the pulse by 50% and so on.
Remember that the color you plug into the 'add' is the vertex color you need to paint. If this is the only thing you have going on in your material that is fine, but you can set up a vertex color of red to control a diffuse texture, the vertex color of green to control the flickering offset, and the vertex color of blue to control a normal map addition. Multiple tweaks can be done to a single material, so be careful of this. Study your material first if there are no 'notes' included in it.
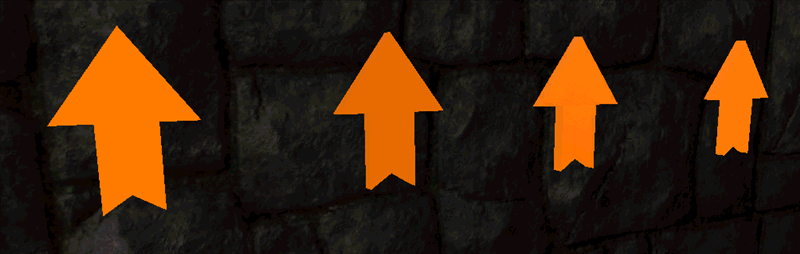
This is the current 'blinking' that should come out of your new shader update. The speed might be different, but they all blink at the same time.
The next part is to add variation to your model. In this case, everything is emissive, but if you have a different model, only the 'emissive' sections need their vertex colors painting out.
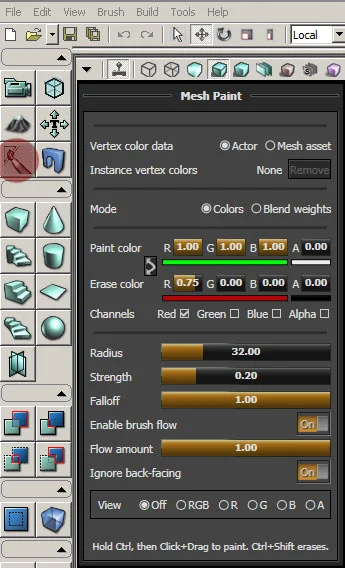
To paint your models vertex colors, go to the “Mesh Paint Mode” located on the top left of the editor.
With your model selected, choose which colors you want to paint “channels” and the strength “Paint Color”. The value of the 'Paint Color' is the max color that vertex can be. You hold Ctrl and left click to paint that value. Likewise, the 'Erase Color' is the lowest color that vertex can be. You hold Shift + Ctrl and paint to erase that value. This is where choosing to paint a single channel 'Color' comes in handy, because only that selected value will be affected.
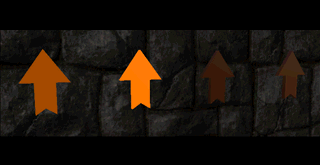
If you keep the first arrow the way it is, paint all the verts of the second arrow with a value of .25, paint the third with a value of .5 and the forth with a value of .75, this is the end result.
Once these changes have been made (making sure that every vertex is even, otherwise you will get some bad results) this is what you should get.
But that's not all. This currently only shows an offset to the blinking material, but we can actually animate this pattern per asset by painting a single piece of geometry with a gradient vertex color.
Since we know how to 'limit' the colors painted, make the base of one of these arrows (or your asset) Red while the tip is Black. Be very careful to do this accurately because any slight offset will drastically distort the 'animation' we are looking for.
A way to see your vertex colors is by clicking on the RGB under 'View' in the vertex painting menu at the very bottom. This shows all the RGB colors for the entire scene. You can isolate these to only show the desired color, in our case, the red.
If we take a look at the gradient of a single arrow, it may be hard to see, but the base to the tope flows from 100% red to 100% black.
The final version of this arrow has this result.
An animated material for an asset with a 'blinking' material. This can allow you to use a single material for multiple purposes, giving you MUCH more freedom to use that memory elsewhere.
If you want to play around with the speed of the flicker, the same method applies, but instead of 'adding' the vertex color to the time, you'll need to 'multiply' it. Remember that when you multiply anything, the value of 1 has no change (anything times one is itself) and the lower you go, the slower the 'pulse' becomes. Absolute black (or the value of zero) is a bad idea since it will equal zero in the end and nothing will animate.
This is the material that you'll need to use.
And this is the result you get when you tweak the vertex values.
These arrows have the exact same values as shown earlier. The lower the red value (closer to black) the slower the pulse becomes because you are cutting down the 'time' by whatever value you paint the assets vertex.
These methods can be used for painting in a direction you want a terrain texture to take (Add in the vertex color into a rotation of a texture) or how fast you want something to pan (Add in the vertex color to a pan variable). The possibilities are endless.
Have fun!
I hope this little tutorial has helped you out. i thank you for your time.