UT3: Decals

Decals can be used for many different things. manhole covers, road patches, subtle colorations in ground terrain, logos on building walls, static tire marks, animated caustics under a bridge or on walls, static shadows, fake skylights, puddles....... the list goes on and on.
Because of the way UT3 handles geometry with multiple materials assigned to it (the more you have, the more expensive it becomes), decals are an amazing way to save resource and add detail or hide seams.
An understanding of the basics in materials is ideal, so if you are not sure how materials work, please check out that tutorial first.
We will need to create a 'decal actor' for this.
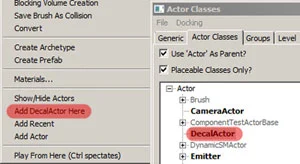
In the 'Generic Browser Window' click on 'Decal Actor' under the 'Actor' menu. Right click in the level where you want the decal to be placed, and scroll down and click where you see 'Add Decal Actor Here'. This will place a default actor, but with nothing showing up. What we need is a material.
First we will need some textures to use. I'll be creating a simple manhole cover for a road.
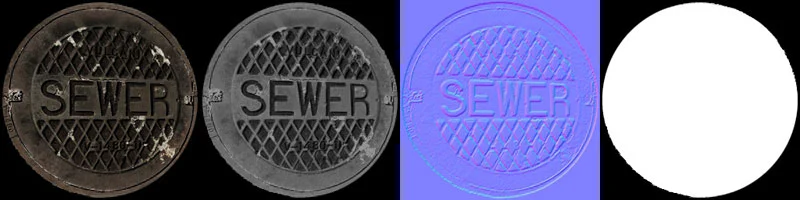
Diffuse, Spec, Normal map and Alpha.
Now to make a material.
The material hierarchy is set up in the same way as any 'basic' material as covered in a different material; however you need to create a decal material instead of a regular material. It is should be located 3 options above the regular material option.
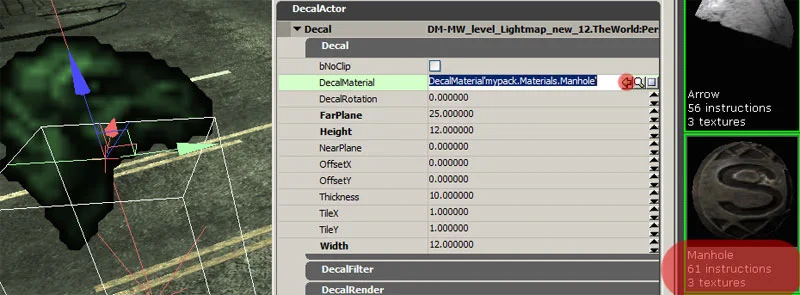
Once your diffuse, spec and normal map are linked to your material, save it out where you'd like it to be stored. Select the material in the 'Generic Browser' and go into the properties of your decal node. Under 'Decal Actor/Decal/Decal/Decal Material' there is a green button pointing to the left. With your material selected, click that button and your manhole material will be linked to your decal actor.
Since this is a decal of a man hole, all we want to see is the man hole itself, not the black around it. The alpha texture gets rid of this black area we do not want.
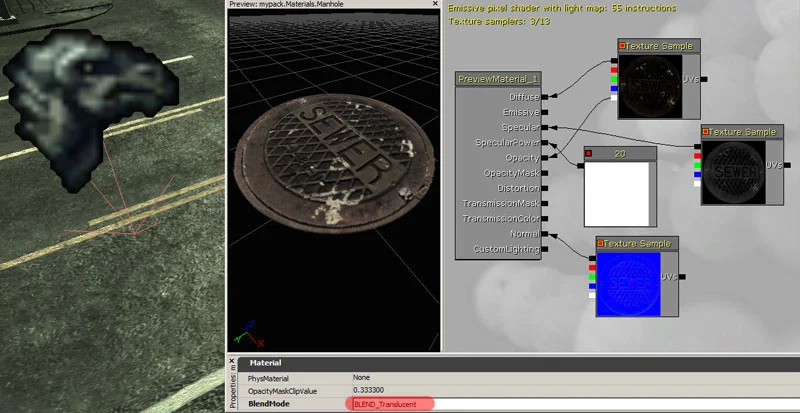
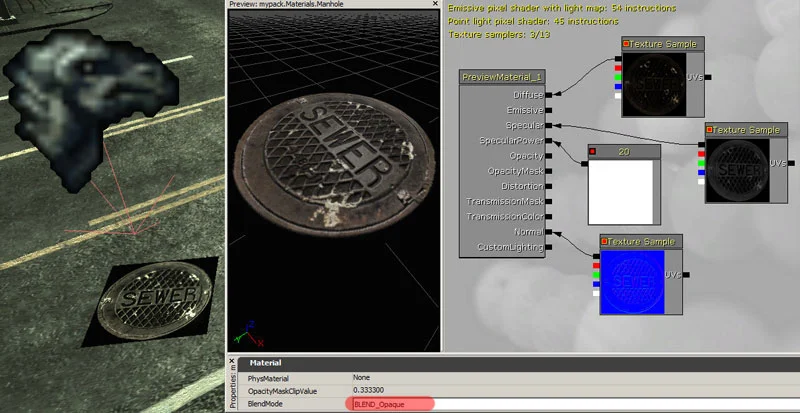
Unreal reads the black as transparent, and the white as opaque. When you plug in the texture to 'opacity' and set the material to 'BLEND_Translucent', everything disappears. The material setting 'BLEND_Translucent' will be covered later on, but for this example, it is not what we are looking for.
We need to plug in the alpha channel to the 'Opacity Mask' and set the material to 'BLEND_Masked'. Using these settings results in no gradient to your alpha and allows for the use of normal maps and spec maps.
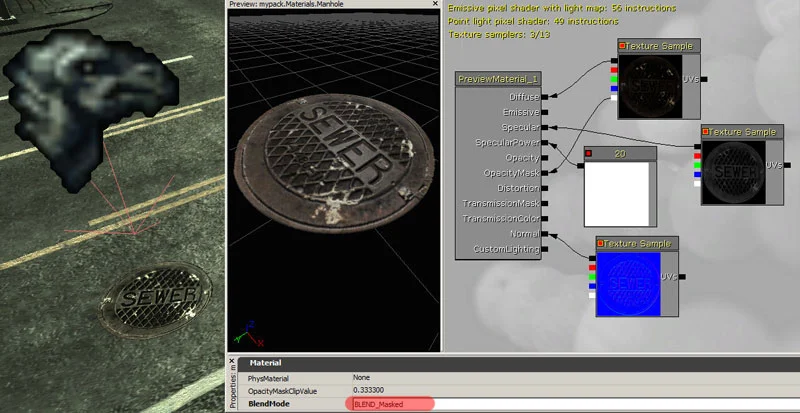
In a nut shell, that is the decals by using 'BLEND_Masked' setting.
Decals can be rotated, scaled and stretched to fir whatever surface you'd like them to.
We will now go over the 'BLEND_Translucent' option in the materials.
If you set your material to 'BLEND_Translucent', the material will not show up if the lighting model is set to 'MLM_Phong'. For it to work correctly, you need to select the 'Lighting Model' to 'MLM_Unlit'. Other combinations of settings will give different results, but if you use 'unlit', you have to plug a color or value in to the 'Emissive' channel of your material. If you do not, your material will not appear correctly, or at all.
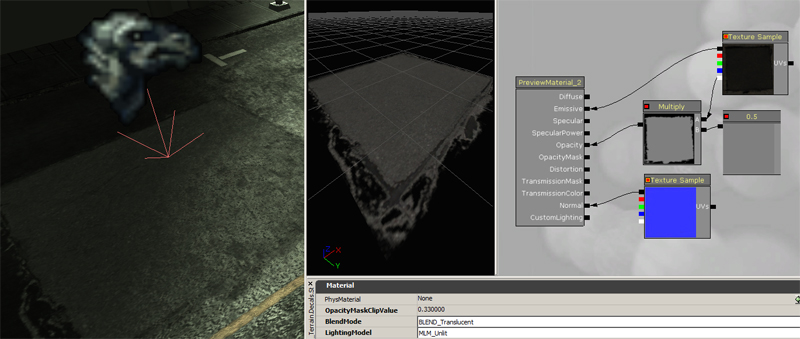
As you can see from the screen shot above, there is a problem with this method. Although it adds some variation to the ground, and you see the spec and ground texture through the decal (the decal alpha is set to 50% so it is slightly transparent) there is no normal map showing, even though it is plugged in to the normal channel, and the decal is evenly lit in the light as well as the shadow. This is because of the 'unlit' setting the material has. The Emissive value the material has is the color you will see mixed with the strength of the transparent value.
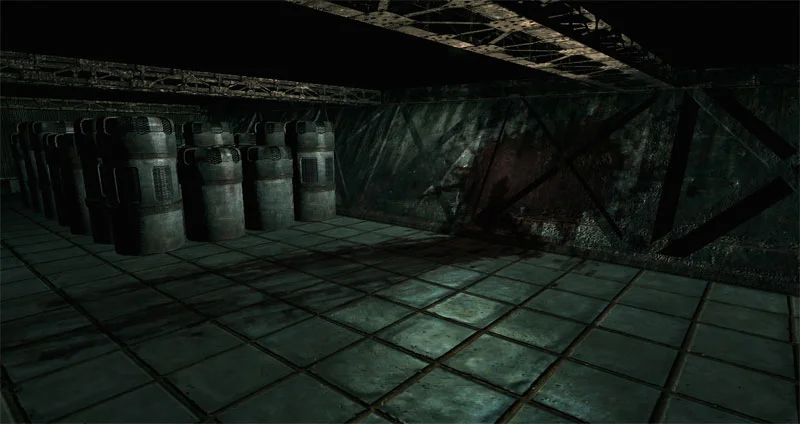
This has its purposes, just be aware of these issues if you ever need to set it up like this. One major down side is if you are creating a 'spooky' game where everything is dark asside from a flashlight or a movable light source of any kind, if you have this setup, you will see the decal in a distance since it has the texture plugged into the 'emmisive' with a transparent option as well. To get around this, lets take a look at a coridore type game play.
Usually, you will create an alpha mask for your texture to show up with a 'cut out' look to it, however the blood splats you see in the screen above are created with a white area around the side. The shader looks like this.
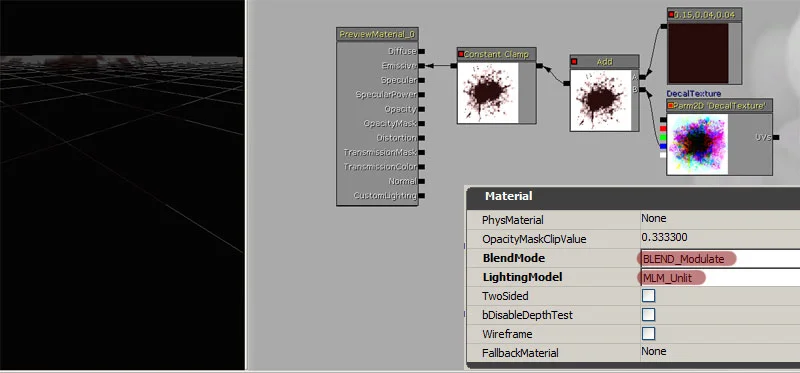
As you can see, the decal is hard to see in the preview window on the left, so some 'trial and error' will be required. How this shader works is this. When you change the 'BlendMode' to 'BLEND_Modulate', any value set to white will be clear or not render out. (Make sure that you place a 'clamp' at the end of the shader network shown above.
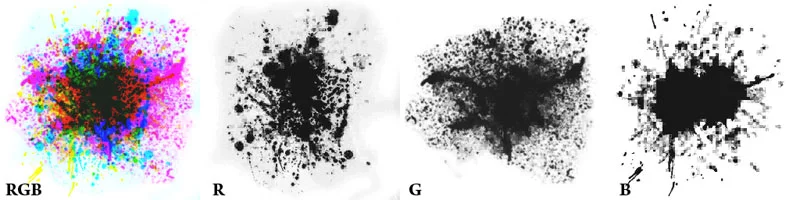
The RGB channel has 3 textures in it. Each channel has a black and white value illustrating a different 'blood splatter'. When you 'add' any one of these channels to a color, the brighter the color, the more transparent the decal will be in the black areas. The clamp stops any value from being greater than 100% white.
When you set it to BLEND_Modulate, whatever material you lay it on is transfered onto the decal. The spec, normal and diffuse all show up but inherit the tint of the color you 'add' to the textures color.
If you have an existing texture that is inverted (the outsides are black and inside white), simply use an invert funtionion (oposite) to switch the black and white values.
This is probably one of the most commonly used decals in unreal, next would be the 'mask' decal. Asside from these, not many other options are used, so make sure you're familure with these funtions, they will come in handy in the future.
On a side note:
Decals do not always have to be used to illustrate grime, blood, goop, tire marks, streaks in the pagement or physical representations of 'filth'. Think outside the box when dealing with any game related art. If you have a wire fence, and you have to change a light source to a much more 'processing heavy' setting to get a chain link fence masked out to cast a shadow, simply use a decal to achieve the same look. This will not always work, but in some areas, it can greatly increase the visual quality at the same time speeding up the game.
Also remember that decals are a GREAT way to hide repeating textures or seams.
I encourage you to explore the different settings and see which work best for you.
I hope this little tutorial has helped you out. i thank you for your time.