Fire Hydrant: Texturing Tutorial

This tutorial will show the breakdown of the model and the methods of achieving the quality in the model that you see above with the use of baked out high res models, and the breakdown of the diffuse, spec and normal texture.
Like any tutorial, here is a quick step by step of the models construction


The next step would be to lay out the UV’s; the basics apply to this asset with one exception. The two smaller nozzles on either side are identical. To save texture space, I laid out the UV's for the left side, and mirrored it to the other. This will keep the UV's exactly the same for each one. Even though the UV's for the right nozzle will be reversed, the normal map will not be flipped, and for the following reasons. Since I mirrored the geometry, the faces of those polygons are now facing the other direction, in a sense, they're flipped. Since the UV's of those faces are flipped, the resulting normal map texture will appear correctly. Long explanation short, two negatives make a positive.
Following this would be blocking out the base colors for the model, but before that, I will cover the normal mapping process.
Fallowing this would be blocking out the base colors for the model, but before that, i will cover the normal mapping process.
Inside Max, there is a baking tool that is rather easy to use.
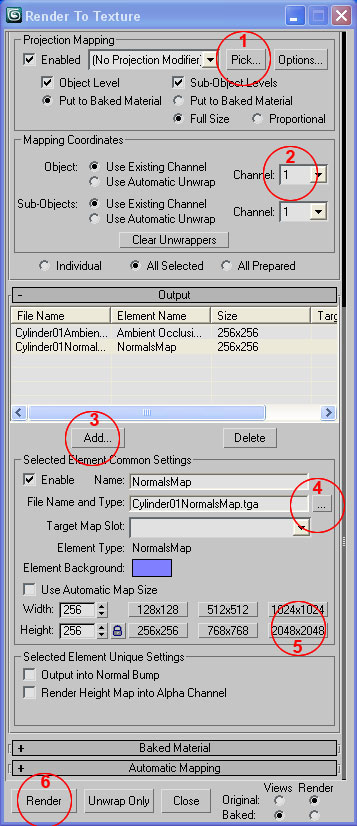
Click #0 on your keyboard, or navigate to 'Render / Render to texture'.
Once the window is loaded, select your low poly geometry, and check off the 'Enable' box under the 'Projection Mapping' sub menu, click the 'Pick' button, and select the high poly version in the 'Add Targets' menu that pops up.
Make sure that you select the correct UV channels to bake to (default is channel 1).
Further down you will see an 'Output' sub-menu. Click on the 'Add' button and choose the texture baking option you desire.
A list of options should now become available; Name, File name and type (this is where max shows the destination of the baked texture), and UV width and Height.
Make sure you place your baked texture in a location that you will not lose track of, and named something you will remember. usually when you bake out textures, there will be multiple pieces that will be baked at separate times, so it's always good to keep the old ones just in case.
If you are modeling something with a 512X512 normal map, it is a good habit to bake out the texture at least twice the size, or if you want to make sure everything works correctly, do 4 times as large. For this asset, I baked it out at 2048X2048. The reason for doing this is to make sure that every piece of geometry is baked out correctly. Quite often if a normal map is baked out at the final resolution quality, you will have artefacts hiding all over the place, and unless you want to hang paint them out (which is never fun) you can simply increase the texture size, and down size it in Photoshop. The texture will be much more accurate to what the high poly will look like in the end.
And lastly, click the 'Render' key. Different settings bake out in different ways, so make sure the texture itself works before you close the rendering window.
If red dots show up in your render, this means that the 'cage' was not large enough, or there is something wrong with your high or low poly model. With your low poly model selected, scroll down in your 'modifier' list until you see a sub title called 'Cage'. Click the 'Reset' key, and move the 'Amount' up until the cage itself covers the entire high poly mesh. This should fix any problems you have.
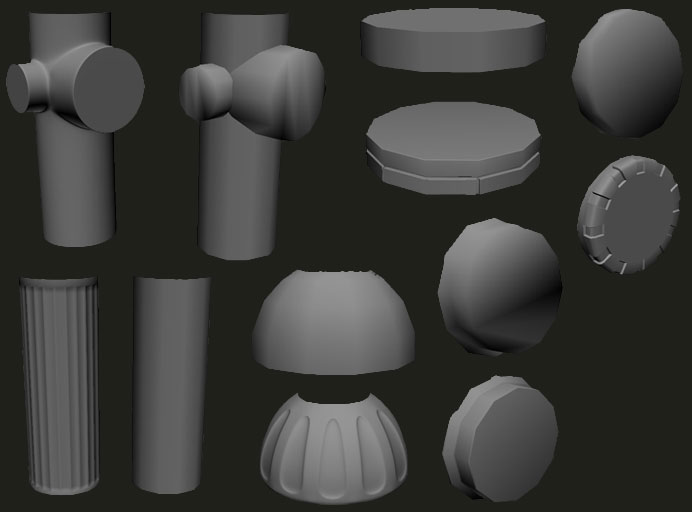
These are the high and low poly models side by side, just to give you an idea.
The following is a step by step render of the fire hydrant in the stages I tool. First is the diffuse texture with the spec value turned up slightly to get an idea of the highlights it will have. Next comes the diffuse with the normal map slowly layered in. Lastly is the final product with 3 stages of spec. this might not be quite as noticeable between the 3 renders, however spec should not be too obvious and overly bright for this asset.

These are the scaled down versions of the textures.

The following image is a step by step break down of the beginning to end diffuse texture process. It reads left to right, top to bottom.

Once the diffuse texture is complete, I copied the layers into a new folder in Photoshop and used them to create the specular color as well as minor details on the normal map.
I hope this little tutorial has helped you out. i thank you for your time, and wish you all 'Happy Modeling'.