UT3: Reflective water
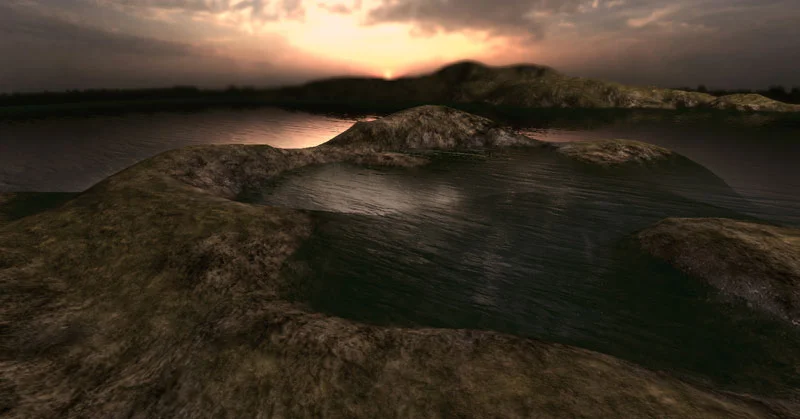
This tutorial will cover the creation of a truly reflective water surface in water. This water material reflects everything above it as well as becomes more opaque as the 'water' gets deeper and changes color the closer it gets to the land. I should point out that this is strictly a material water shader, there is no deformation in the geometry at all. Also i should note that since this shader will be plugged into the 'emmisive' of the material, it is ideal for in anterior scene.
First we will need a scene to work with.
* Skybox
* Room box (large enough for the water to be opaque)
* some kind of gometry (Terrain would be best)
* Lighting
* Post processing (not needed, but lets make it complete shall we)
Without the water, this is what the scene looks like.

To add the water, i created a BSP plane. The reason why i use this and not geometry exported from another 3d software is because the BPS geometry can easily have their UV's scaled up or down.
Something to keep in mind while using the BSP plane is that many people find it impossible to select it. Just like any geometry, it has a 'posative' and 'negative' side to it. If you can not select it from the top, move your camera below it and try selecting it from there.
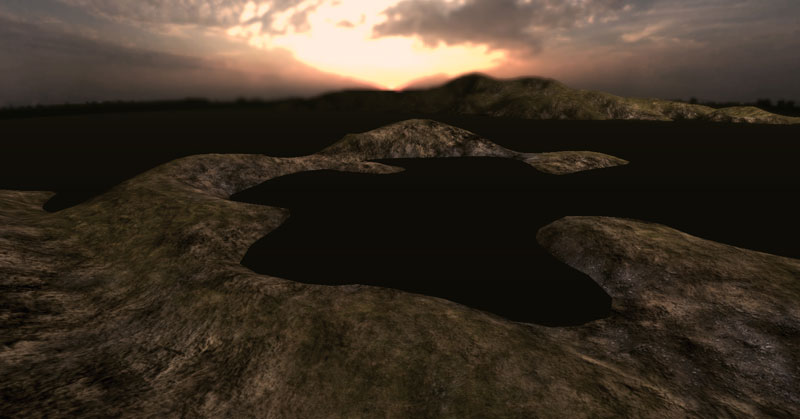
This image shows the plane with a black shader to illustrate where it will intersect with the terrain. Find a height that looks best for you. This can of course be changed later on, but if that is done after the shader is created, then it may bave to be tweaked to fit the scene.
This plane is a source of reference for the material editor to actrually reflect the scene. It tells it the location and rotation. Make sure you keep this plane facing directly up, otherwise the reflection will act strangly.
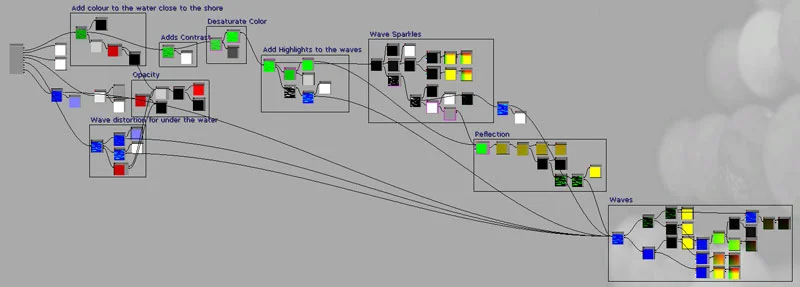
I broke this up into 9 major sections with a description of what they do. If they are un-clear in the image above, other screen shots will be available further down this tutorial.
These major sections are as follows.
Waves : This gives the bump values of the waves.
Reflection : Here is where the normal map information is added to the reflection, causing the reflection itself to distort.
Wave Sparkles : This gives those subtle specular 'sparkles' you see in water. This is optional of course.
Add Highlights to the Waves : In here we add some normal map information to add a light and dark value to some of the waves, giving it more defanition.
Desaturate Color : as it reads. This desaturates the intensity of the color a little bit.
Adds Contrast : Here we make the lights lighter and the darks darker. By doing this after the 'desaturation', it helps to remove the gradiant you may see.
Add Colour to the Water Close to the Shore : Again, as it reads. Based on the depth of the water (how close it is to the shore line) the water color will change, in this case it has a slight green color added.
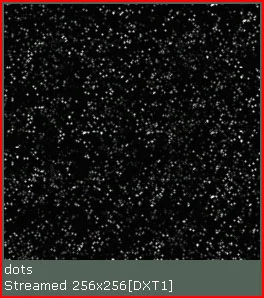
Lets take a look at the 2 textures we used to make this material.
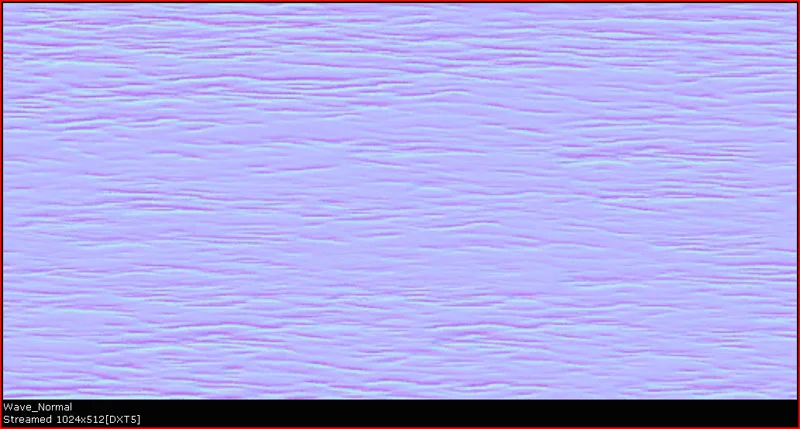
The top image is the normal map of ripples in water. There is a black and white alpha included in there for rotating the water at certain sections. (this helps with cutting down on the repeating pattern)
The 'Dots' texture is the specular highlights of the water.

The waves are made up of the same texture added to itself 3 times but at different scales, creating large and small waves. The largest wave (1) is added to the rest but also used to rotate the surface of the next normal map down, but only at certain sections.
1. This normal map is repeated 0.1, 0.1; and panned at 0.01, 0.01; The alpha is multiplied by 0.07
This normal map is multiplied by 1.25, 1.25, 0
2. This normal map is repeated 0.3, 0.3; and panned at -0.015, 0.006;
This is then Rotated by 0.25, 0.5, 0.025; The alpha which was multiplied by 0.07 in texture 1 is plugged into the 'time' value.
This normal map is multiplied by 1.25, 1.25, 0
3. This normal map is repeated 0.8, 0.5; And panned at 0.03, 0.02
This normal map is multiplied by 1, 1, 0
4. This normal map is repeated 2, 2; and panned at -0.04, 0.03
Each multiplied node is 'added' to one another, but the final normal map (4) does not require it since one of the textures needs to have its blue value caried through.
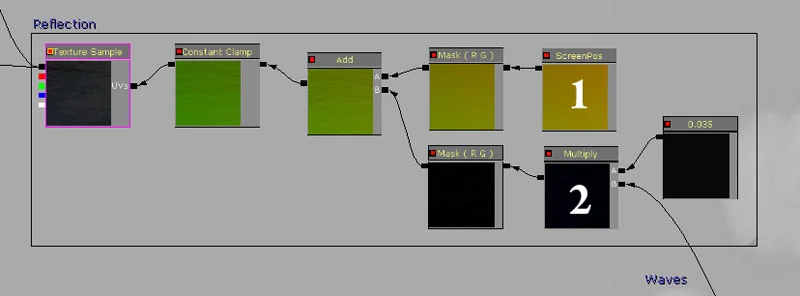
1. The wave is multiplied by 0.035. This multiply decreases the intensity of the wave. We then need to 'mask' it by Red and Green.
2. This is where the coardinates for the 'SceneCaptureReflectActor' is set. You will need a 'Screen Pos' node for this and then mask it by Red and Green since we only need two axis. This is then added to the multiply of the waves we worked on earlier. The reason we masked out the Red and Green is because that will add height to the screen position. If you want the height to be stronger, increase the constant that is plugged into the multiply. The higher this is, the more intense the waves will be, likewise, the smaller you make it, the calmer the waves.
Since we are adding information from one node to another, this must be 'clamped' and then plugged into a texture sample. Now this texture sample we still need to create, and will reference the reflection plane previously created in the scene.
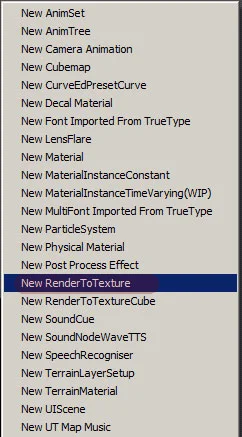
In the 'General' browser, right click and select 'New RenderToTexture'. The image to the left is where it's located, and below is the window that should pop up.
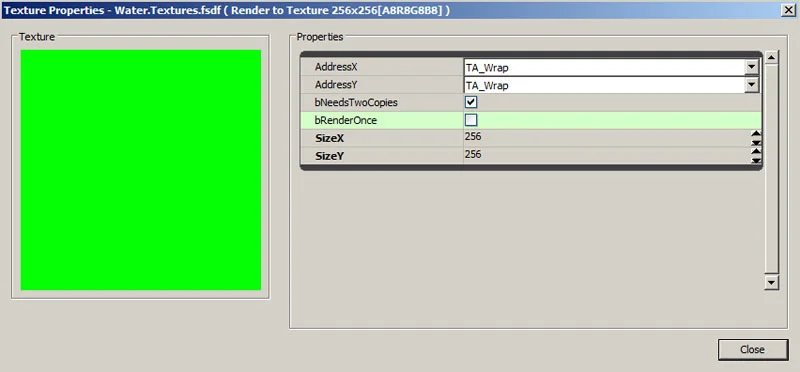
This window tells the engine how big of a render it should take. The higher the render, the more processing power will be consumed. If you set up a shader like a mirror, you will notice any pixolation because the reflection will be smooth, but with waves, the images is distorted, so it's only the colors we need to copy over allowing for a smaller texture. That being said, if you are creating a calmer day, a higher resolution may be required.
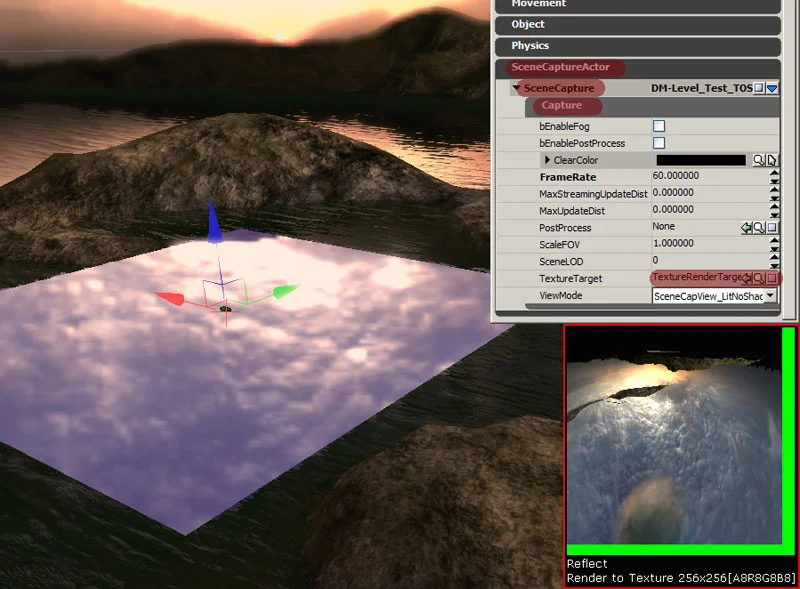
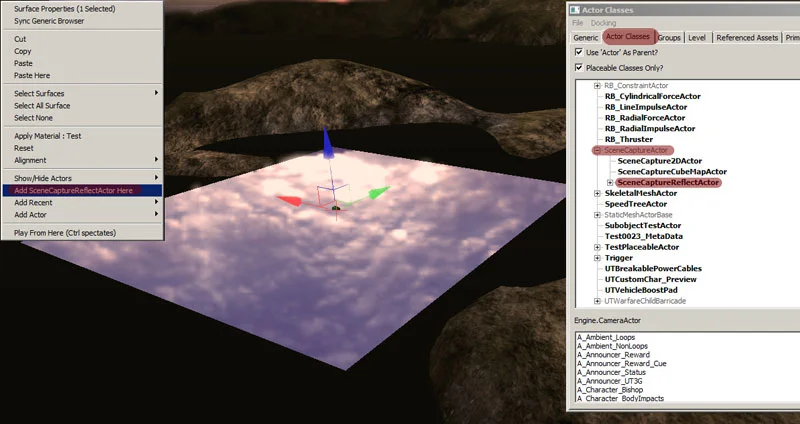
What you now need to do is select your 'RenderToTexture' you just created in the general browser window, click on the 'SceneCaptureReflectionActor' previously placed in the scene, open its options and navigate to 'SceneCaptureActor/ SceneCapture/ TextureTarget and click the green arrow. This will link whatever the 'reflection actor' sees into the 'reflection texture' you just made and create a texture based on its size in the X and Y. Please pay close attention to the 'FrameRate'. In nearly every case, the default frame rate of 1000 can greatly be lowered down to 60 if nor lower.
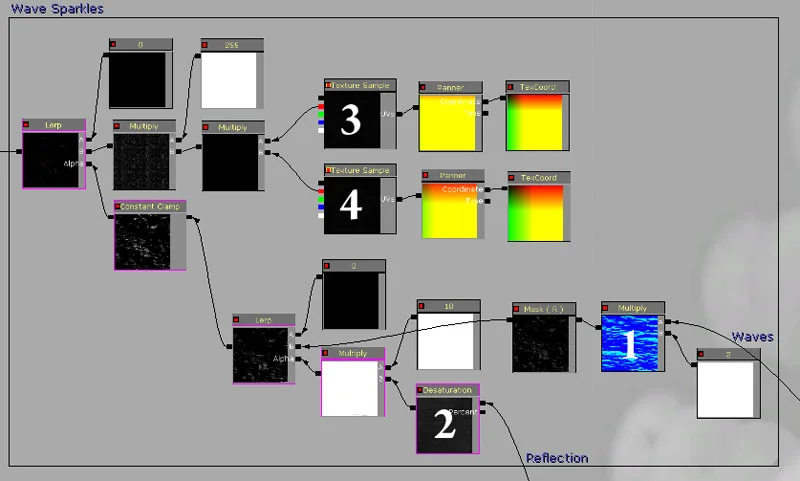
This section will go over how to create wave sparkles
1. We need to multiply the wave by 2 and then maked by Red. This will plug into a the B channel of a lerp.
2. This is the reflection section we just created prior to this, but it needs to be desaturated, then multiplied by 10. What this does is it increases the lighter areas of the reflected sky and since it is desaturated, it can then be plugged into the alpha of a Lerp.
The A channel of the lerp needs to be black (0). What this does is where the waves are, they will show up where the light areas of the water are, and the darker areas remain black.
3. This is the 'sparkle' texture which has a coordinate of 3.4, 3.4 and a panner of 0.01, 0.02
4. This is the same 'Sparkle' texture which has a corrdinate of 2.2, 2.2 and a panner of -0.03, -0.01
The two specular highlights are then multiplied, making it so only when two dots over lap will there be a white sparkle. This is then multiplied by 255 to increase the intensity of sparkles. The firt bit covered (1 and 2) need to be 'clamped', This is because we have multiplied different textures a lot and need to make sure they're within 0 to 100 black and white. This is then inserted into the 'Alpha' of a lerp, the sparkles are inserted into the B channel, and a constant variable of 0 into the A.
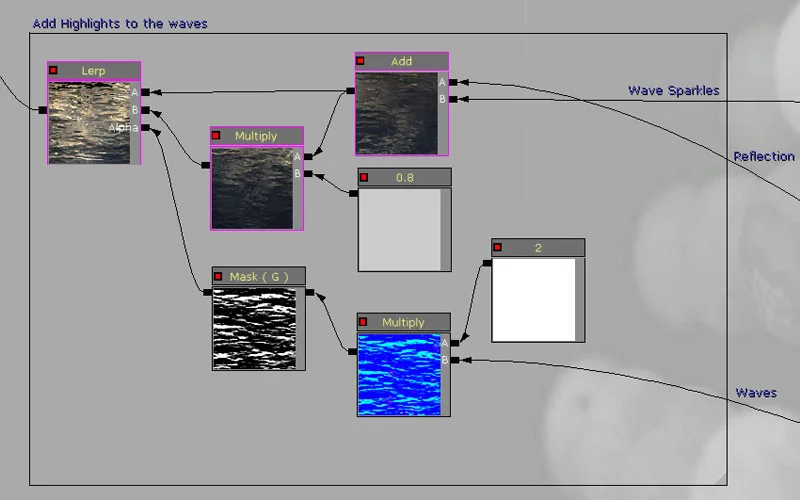
The 'Wave Sparkles' and 'Reflection' sections are added to one another. The original needs to be attached to the A of a lerp, and a version multiplied by 0.8 into the B. The 'Waves' need to be multiplied by 2 to increase their intensity, masked in the Green channel and plugged into the alpha of the Lerp. This adds the sparkles and waves together and tweaks the intensity of the waves based on the 'green' channel of the normals. If you want the waves to be lighter or darker, tweak the 0.8 value.
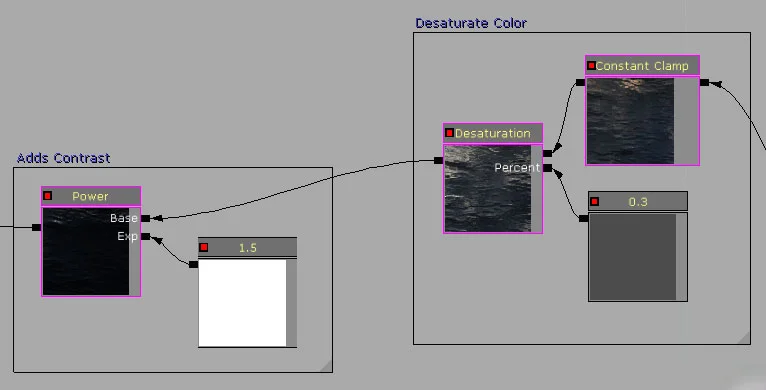
The Lerp from the 'Add Highlights to the Waves' section needs to be 'clamped' and 'desaturated' by 0.3. This then is plugged into a 'Power' node with a value of 1.5 to increase the over all high and low values.
Before we continue with this, we must create the 'Opacity' nodes because the rest of the emmisive shader requires it.
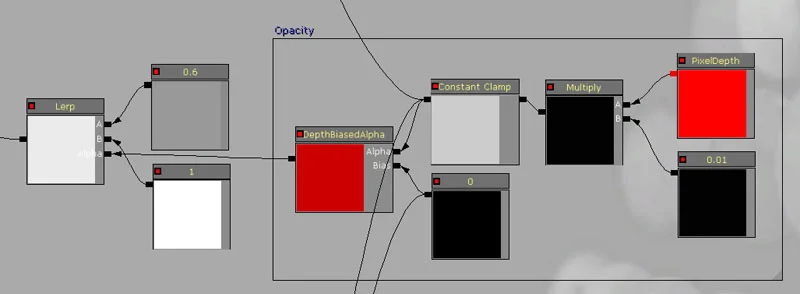
You need to create a 'Pixel Depth' node and multiply it by 0.01 . What this does it is looks at the distance from the plane any geometry beyond it and will cause it to be transparent or opaque. This is then plugged into a 'Constant Clamp' with a setting of 0.8, 1 . The constant clamp is then plugged into the 'Alpha' of a 'Depth Biased Alpha' node with a bias of 0. The 'Depth Bias Alpha' should have its 'Bias Sca'e set to a value of 1000. This entire section determines how deep something should be before it is no longer transparent. All of this is then attached into the alpha of a lerp with A being 0.6 and B heing 1. Finally you can plug this into the 'Opacity' of the shader, and you're done.
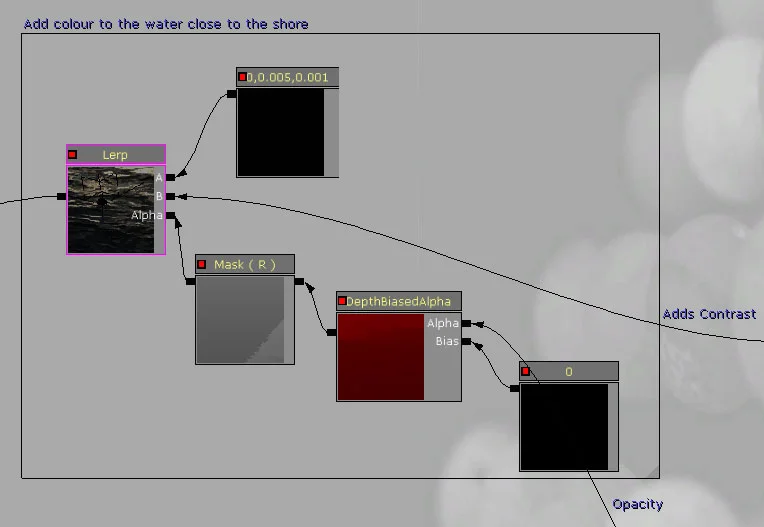
To finish off the emmisive shader, we need to add some color for the water when it becomes shallow.
If you plug the 'Constant Clamp' from the 'Opacity' section into a 'Depth Biased Alpha' node with a Bias of 0 and change the 'Bias Scale' to 5000, this will push the color further away from the shore line. You will need to mask the Red channel and plug this into the Alpha of a Lerp. If you plug in the 'Power' node from the 'Adds Contrast' section into the B channel of the lerp, this will be the color for the open water. Next you need to create a 'Constant 3 Vector' with a value of whatever you want. The darker the better. If you want to, you can add this color to the water itself, but in this case i simply used a standard RGB value of 0, 0.005, 0.001 . This is now ready to be plugged into the emmisive of the material.
To create the distortion for under the water, we will again be using the normal maps created from the 'Waves' section.

Since the water gets more and more shallow, we need another 'Depth Biased Alpha' to tweak how far away from the shore the waves will be, and the intensity they will have. If you plug in the 'Constant Clamp' from the 'Opacity' section into the alpha of the 'Depth Biased Alpha' node, give it a 'Bias' of 0 and a 'Bias Scale' of 250, this should give you a good fall of for the shore line. This then needs to go into the 'Alpha' of a lerp node.
Next we need two multiplies, both for the waves. The first needs to be multiplied by 0.5, 0.5, 1 and the second by 2, 2, 1. The first one needs to go into A, (this is the shore line, that's why it was multiplied by less, to give less distortion) and the second into the B. The lerp then needs to be plugged into the 'Distortion' section of the shader.
And finally, the specular highlights. You can go about creating this however you like, but i simply used a constant variable of 5 for the specular and a constant variable of 15 for the specular power. In order for the spec to show up correctly, you need to plug in the normal maps into the 'Normal' section of the shader, otherwise the watter will appear flat since everything we have done up untill now is strictly with the textures, however the waves are a little too strong so i multiplied it by 0.5, 0.5, 1.
The very last thing that is required is to give the shader the right settings. Select your shader and change the 'Blend Mode' to “BLEND_Translucent”. Since it has a 'Translucent' setting, the spec will not show up in the material editors preview window, nor will it show up in the editor until everything is baked.
This should give the water a fairly good look.
I hope this tutorial has helped!