UDK – Unreal Development Kit
Ambient Occlusion
Lightmass: Ambient Occlusion customization for UDK through the world properties settings.
This tutorial will cover some basics for getting you started with Global Illumination based around the 'world Properties' sections. I strongly recommend you read Epics 'new features' located here.
http://udn.epicgames.com/Three/DevelopmentKitBuildUpgradeNotes.html
Ambient occlusion information can be found at this site
http://udn.epicgames.com/Three/Lightmass.html
If you go up to the 'Window Properties' section of the map located under 'View' you will find a 'Lightmass' section. Ambient Occlusion is a part of the lighting process in unreal, and consists of 2 parts. to activate the 'baked' ambient occlusion, check off the option that reads 'Use Ambient Occlusion?"
If we compare an existing shot of the shadows to a new one with 'Ambient Occlusion' enabled, you will notice a change, but there are 2 main types of ambient occlusion at work here.
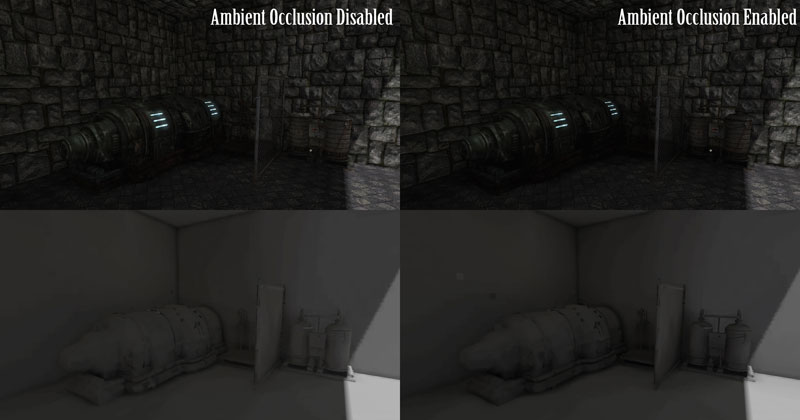
On the left is the default image, and on the right is the new one with ambient occlusion enabled. The bottom images illustrate the shadows in the scene, but there already seems to be some sort of 'ambient occlusion' already present in the scene on the left which is the one with ambient occlusion turned off. What Unreal is doing is it bakes in the ambient occlusion with the shadow map for the image on the right, but the dynamic ambient you see on the left is still being used in both shots.
What the default (dynamic) ambient does is it gives objects from a distance shadow detail. The further you move away from it, the more pronounced it becomes up to a certain point then it stays there, but when you move closer, it slowly fades away, and this is only for geometry that is close to one another such as right angles.
What is happening when you enable the 'ambient occlusion', you get a more accurate representation of what a real ambient occlusion is, and it becomes a part of the light map or shadow map itself. Because of this, it is not 'animated' in any way, and cost a little bit more for the baking of lights, but not by much, but the game does not run slower because it's a part of a texture that already exists.
For the next two options, (Direct Illumination Occlusion Fraction) an (Indirect Illumination Occlusion Fraction), the best way to understand these options is to understand occlusions. When you shine a light on anything, there is very little ambient occlusion on it because the light fills everything in, however if you shine a light on a chesterfield from above and you look below, you will notice a 'fade off' of light, this is because the light bounces around the room, and the more it bounces, the less intense it becomes until finally there are some areas the light will not reach. Ambient Occlusion is the function to mimic this shaded area. In games, light can reach every inch of any model unless it is fully shaded, but to mimic this limit of light, ambient occlusion is used.
For these two functions, the “Direct Illumination Occlusion Fraction” refers to how much ambient occlusion you see in direct light, and the “Indirect Illumination Occlusion Fraction” refers to how much you see in shaded areas.
“Occlusion Exponent” reffers to the fall off or 'contrast' of the ambient occlusion.
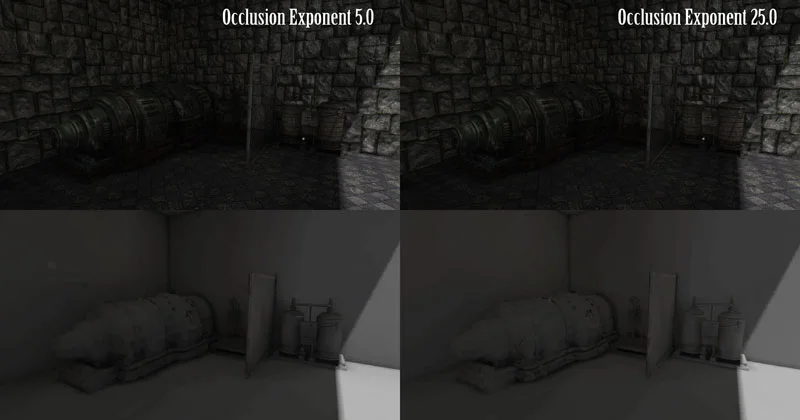
A higher flue increases the contrast, tightening up the occlusion; a lower value makes it more broad and soft.
The 'Max Occlusion Distance' is simple to comprehend. If this value is set to 200, and there are two walls located 205 away from one another, neither will receive ambient occlusion from one another. If the walls sit 185 from one another, they will receive ambient occlusion, but the value will be very small. This option is here to help have more control over your scene and the items within it.
I hope this little tutorial has helpd you out. i thank you for your time.